January 03, 2013
Does the thought of installing a projector yourself seem out of your league? It really doesn’t have to be. By following your projector’s manual, and using these step by step instructions, you will be relaxing in your own home theatre, watching your favourite movie in no time.
- Using a Mounting Bracket:
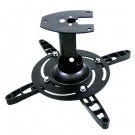
- When you purchase a projector, a ceiling mount should also be on your list. Purchase one that can hold the weight of your projector, and that will fit the mounting pattern (holes) of your projector. Keep in mind that the holes will be on the bottom of your projector, because it will be mounted upside down. Mounts are available to suit many different ceiling types, including angled ceilings.
- Where to mount?
- Your manual will give you clear indications of the distance range its’ lens can tolerate. This is a measure of how far the lens can be away from the screen or wall. For example, your projector may give a range of between 3-5 metres. You should keep within these distances to achieve the best possible image quality.
- Install the mount.
- Affix your mount to the projector. Follow the instructions that come with the mount kit and the projector. Keep in mind that projectors should be mounted above or below the screen, rather than straight toward it. Therefore some calculation is required is ensure the distance and height of the screen do not encourage image distortion.
- Connect your cables.
- Connect your cables to the projector following your projector manual. Consider using some cable management devices to neaten them, and avoid unsafe situations of dangling or slack cables.
- Calculate the mount-to-lens distance.
- Use a tape measure to determine the distance between the centre of the mount and the front of the lens. For example – 15cm
- Add this length to the tolerable distance range between the projector's lens and the screen. If the mount-to-lens distance is 15cm, the new total for an original range of 3-5m, is 3.15m – 5.15m.
- How high is your screen?
- Measure the distance from top to bottom of your projector screen. This will help you determine the “image offset” which decides how high you are able to place your projector. If you mount your projector higher than recommended, this is when you will experience image distortion. Keep in mind that if you are installing your screen at the same time as your projector, you will have greater flexibility to find the ideal position, as you can determine this in conjunction with the projector.
- Calculate the image offset.
- Your projector will have a pre-determined image offset range. For example, if it states an image offset of 130%, then you are able to mount the centre of the lens 30% higher or lower than the screen without distortion.
- Affix your projector.
- Because this is an important piece of equipment in your Home Theatre, it is important to take your time and avoid cutting corners. Affix your projector to a stud in the ceiling, ensuring it is within the tolerable distance range you have determined prior. This will provide a strong and secure anchor for you to screw your fixings into.
- Turn on your projector.
- Now comes the exciting part, when you can turn on your projector. You can now begin adjusting the projector’s settings to suit your individual room. Follow your manual to get the best results.


